
Bimodal Approach to GenAI Application Architecture
Dual-speed architecture helps you ship stable apps and iterate on AI fast—one product, two release pipelines, and clear contracts between them. Here’s how.
Automated Databricks provisioning on Azure with Terraform and Python scripts—transitioning from PoC to production, overcoming challenges, optimizing deployment.
Sooner than expected, after posting 'Best Practices for Provisioning Databricks Infrastructure on Azure via Terraform', I got the chance to transition the Proof of Concept (PoC) to an internal project. In this article, I’ll discuss the additional steps required to take this from theory to production.
The task of creating a development environment reduced from around 1 hour of human "following directions - paying attention - clicking - waiting" loop to 15 seconds of configuration plus 5-15 minutes of execution time. I am glad that we have this code and to have gained the experience implementing it.
Our developers used to receive development environments on an Azure Subscription by being granted privileges to create their own environments within a dedicated dev/playground Resource Group.
As you’d imagine, over time this Resource Group got swamped. Everybody was creating their own environments the way they wanted:
The most pressing need for changing this setup was wanting the ability to identify a resource:
The issues above, and the acquisition of a new Azure Subscription - dedicated to our Databricks development team -, gave us the opportunity to architect our new internal (Azure backed) Databricks system.
We wanted to:
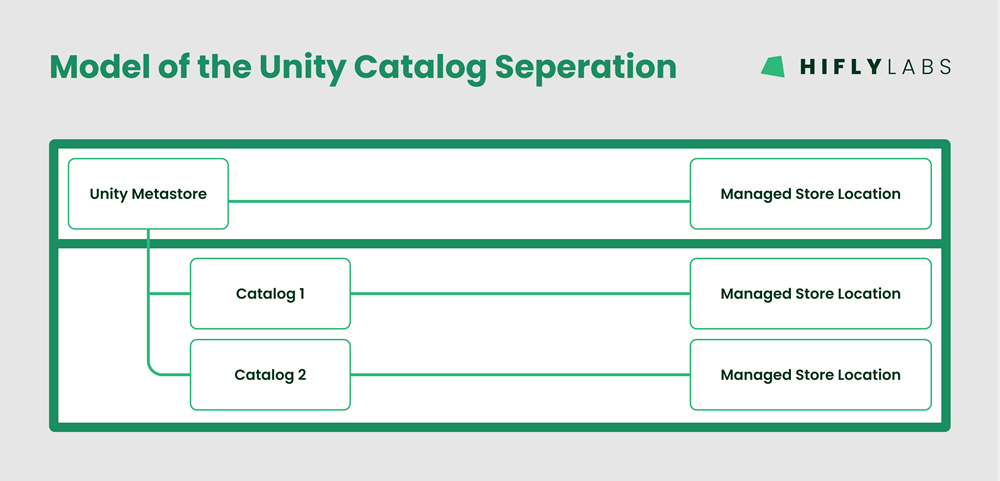
Based on Databricks Best Practices, we found the following model to suite our needs the best:
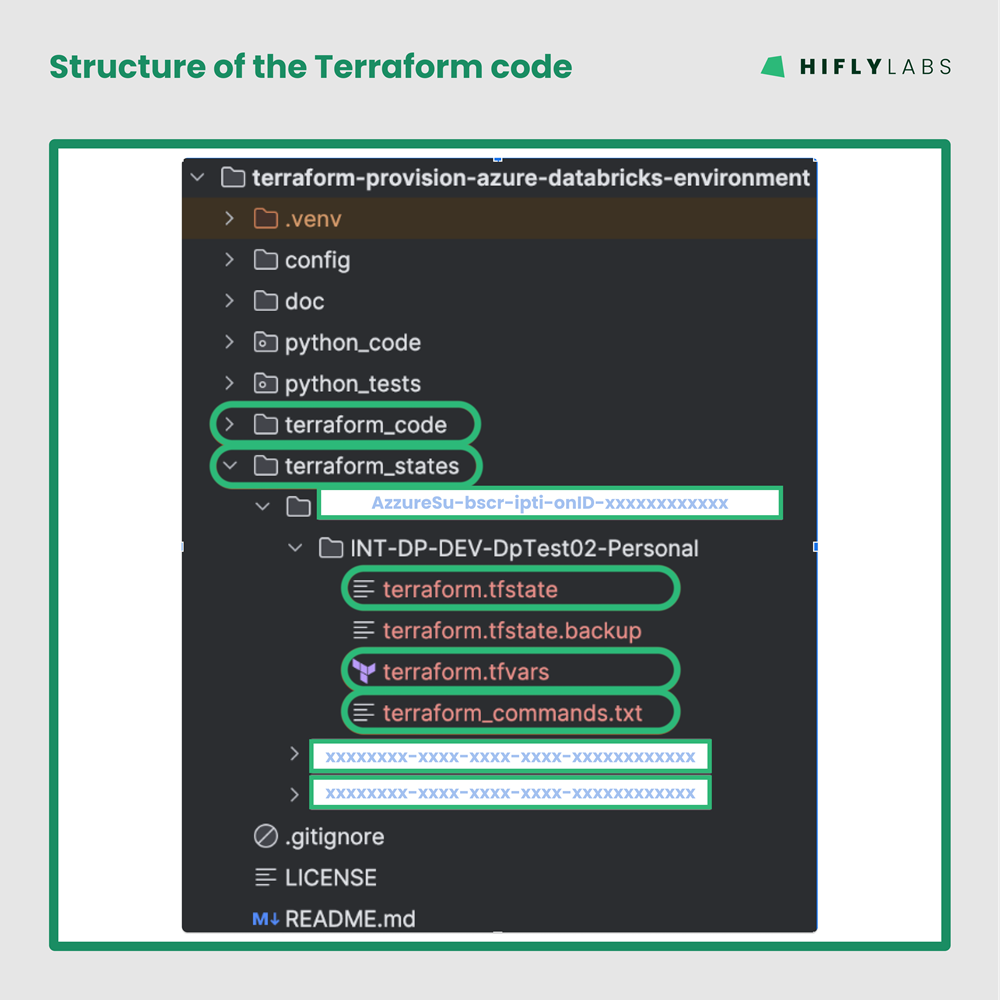
This structure of the terraform code was a question that the PoC left open, however, now we had to make a decision! We came up with the following:
For supporting the requirements: It was a no-brainer for me to continue on the Terraform adventure and make a project based on the findings of the PoC.
Note: It has always been important to me to start a project from scratch instead of following the development of a PoC and try to transform it to a 'production-like' code. My experience is that continuing the development of a PoC has always created an unmanageable mess in the long run - just like the one we were trying to solve now. And in reality, after a completed PoC, a project is never really from scratch any more - so much usable code can be copy/paste-d into their well designed place.
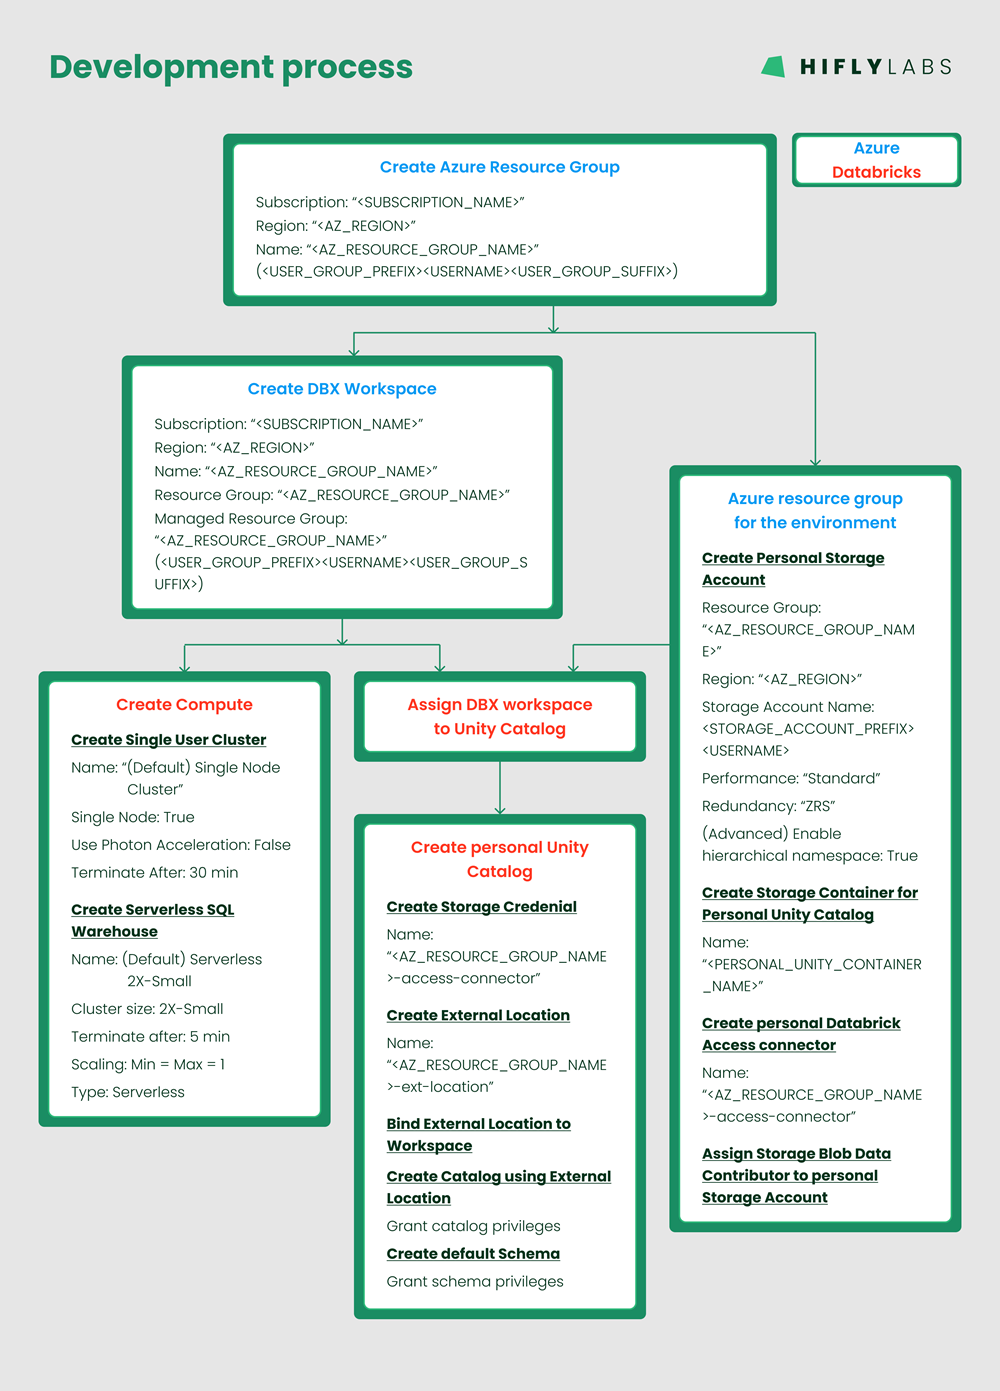
Provisioning multiple environments by:
cerates the following infrastructure:
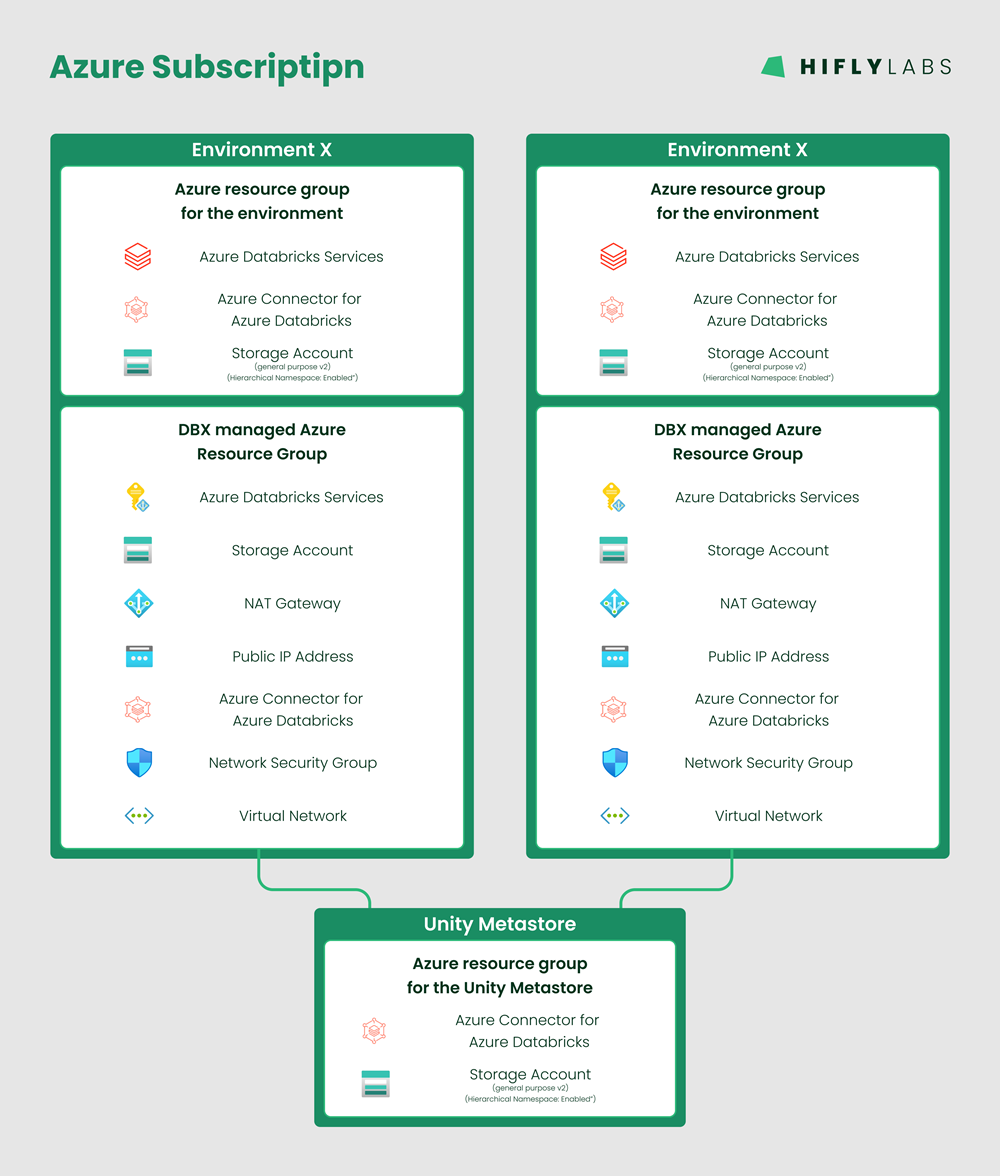
The code is available on Github - https://github.com/gergo-hifly/terraform-provision-azure-databricks-environment.git
$ git clone https://github.com/gergo-hifly/terraform-provision-azure-databricks-environment.git
$ cd terraform-provision-azure-databricks-environment/In order to run the code we need:
$ az login$ databricks configureManual configuration is not the recommended way of configuring an environment. The recommended way is to do the 'Script assisted configuration of Terraform' below.
In case you need more details about the manual configuration, you can find it: here.
$ export PYTHONPATH="${PYTHONPATH}:./"$ cp ./config/admin_config.json.template ./config/admin_config.jsonNote: the script based configuration is fully documented here.
To create the required configurations and commands simply run the following Python script:
$ python3 ./python_code/create_configuration_for_user.pyThe 'apply' command is printed at the end of the Python script and also saved to: './terraform_states/[AZ_SUBSCRIPTION_ID]/[ENVIRONMENT_RESOURCE_GROUP_NAME]/.
Copy either of them into a terminal and simply hit 'Enter'.
Note: There was a user request to include the execution of the Terraform code in the Python script. Yes, it would be nice to have a one stop shop to go to when setting up a development Databricks environment. However, executing the Terraform code from the Python script would require much more work to properly handle error conditions and usage scenarios. For this reason the request was rejected. - The python code only prepares the configuration of the Terraform project together with the 'apply' and 'destroy' commands for a given environment.
At some point, we were testing if the code runs OK with another user on another computer. It came as a surprise to see that on the other computer the code behaved very differently. It was giving warnings and throwing some exceptions never seen before.
As the first step in debugging, I noticed that the Terraform version was newer on the other computer - as a Terraform update came out a day before our trial.
At this point I expected '$ terraform -chdir="./terraform_code" init' to upgrade my version of Terraform, but it didn't.
I solved the issue by manually deleting './terraform_code/.terraform' and './terraform_code/.terraform.lock.hcl', then running '$ terraform -chdir="./terraform_code" init' got the newest version of Terraform on my system.
Note: Later I found out that I would have needed to run '$ terraform -chdir="./terraform_code" init -upgrade' instead of 'init'.
During the implementation, I had a period when I was assigning the 'user' to the 'compute resources' as an owner. This broke the Terraform destroy process. I was not able to destroy a resource which I had no ownership over.
This experience left me in situations where Terraform was left in a deadlocked state. The only solution I found was to manually delete Databricks External Locations and Storage Credentials, and also drop the entire Azure Resource Group (RG) manually.
Dropping the RG was intuitive, however, I kept forgetting to manually drop the Databricks resources.
In this situation I would have been happy if Terraform didn't quit immediately when encountering the error, but it would have destroyed other resources that were unrelated to the 'compute resources'.
At the beginning, I used the Databricks Workspace Provider created by Terraform Azure Provider for all Databricks Workspace related tasks I wanted to accomplish - but I got many errors on the way. From the error messages I got misleading intuitions about the root cause of the problems.
After a while, I figured out that we need to keep in mind what we want to do.
We need to separate the workspace level functionalities from the account level functionalities.
Note: The difference between workspace level provider and account level provider is tiny: the account level provider has a host set to "https://accounts.azuredatabricks.net" and the account_id also has to be set.
I had to use the trick of 'count = <CONDITIONAL> ? 1 : 0' to enable or disable some resource creations.
Introducing this trick broke my code because when specifying a count for a resource, Terraform returns a list of resources. In my code, from this point, I had to reference the resource as element [0] in a list. This behavior completely makes sense, however it was confusing to me - as I expected max 1 resource to be created.
I simply didn't think about the inner workings of Terraform. It is still a bit of a black box to me.
In the PoC, I spent so much time trying to assign permissions to a Databricks Cluster unsuccessfully, so finally I gave up.
First, I was trying to find an alternative solution - and I somehow managed to assign an owner to the cluster resource. It worked well in a sense that the user was able to manage the resource, but this was a short lived solution because it broke the Terraform destroy process.
I was unable to drop a cluster that I had no ownership over.
A possible solution would have been to authenticate via a service principal and make it the owner of all the infrastructure, but we wanted to be able to see who created which environments, and make them owners of their part of the system.
At the end of the day, we have humans running the scripts instead of automated processes, so they should use Interactive login.
By specifying the provider for the Databricks Workspace and using the 'databricks_permissions' Terraform resource, I was able to set the required permissions on the Databricks compute resources, instead of making the user to be the owner of those resources.
After the development phase, I was trying to create a real environment for myself on my own Azure subscription. I needed one and it's quite practical to use this code for taking care of my own Databricks development environments, too. 🛠️
At this time I found an issue:
When a Databricks Admin user runs this Terraform code, it tries to assign the 'CAN_MANAGE' permission to the user for the compute resources it creates. However this is a lower privilege than the user already has!
The Terraform documentation for the databricks_permissions states:
"It is not possible to lower permissions for admins or your own user anywhere from CAN_MANAGE level, so Databricks Terraform Provider removes those access_control blocks automatically."
It didn't happen for me, so I needed to use a workaround:
I introduced a flag in the Terraform variables to indicate this situation. When 'admin_flag' = 'true', the conditional evaluates to 0 and sets it to the count value. This way the permission assignments are skipped. (reference)
As mentioned above, there were situations when we were testing the code with my colleague to see if it works well on his computer or not.
On the first trial, we were getting errors saying that the Unity Metastore does not exist, while the code was trying to assign the Databricks Workspace to the Unity Metastore. It was strange, because we knew that the Metastore existed and we were able to assign the Workspace manually.
After debugging for a while we noticed that the 'databricks_node_type' Terraform resource was returning AWS node types instead of Azure node types on my colleague's computer.
It took a while to understand what was going on in the background. Finally we realized that 'databricks_node_type' calls on the Databricks CLI to get the node types, and we also realized that my colleague was logged into an AWS account on his Databricks CLI.
It is a bit unfortunate that we found out about the Databricks CLI usage hidden in a Terraform resource documentation. At the same time we were fortunate to find it.
Again, it's another black-box-ish gift. 🎁
With this opportunity of using Terraform for a real internal project, I had met with the love/hate relationship of Terraform again.
First of all, I love it for the automatization, standardization, and easy configuration.
Then again, I don't like it because of the steep learning curve, and because it is still a black box for me. For these reasons the implementation took much longer than I expected.
The benefits however, outweigh the negatives, so I am glad that we have this code and I have the experience implementing it. I am quite sure I will use Terraform again in the future.
A final take away:
Never believe the Terraform error messages - try to understand what it's trying to do and use your common sense.
Explore more stories