At Hiflylabs, we’ve seen increasing demand from clients who want to migrate to Databricks. While helping them with these migrations, we noticed one recurring use case that consistently took more time than it should: moving Snowflake Tasks to Databricks.
Snowflake Tasks
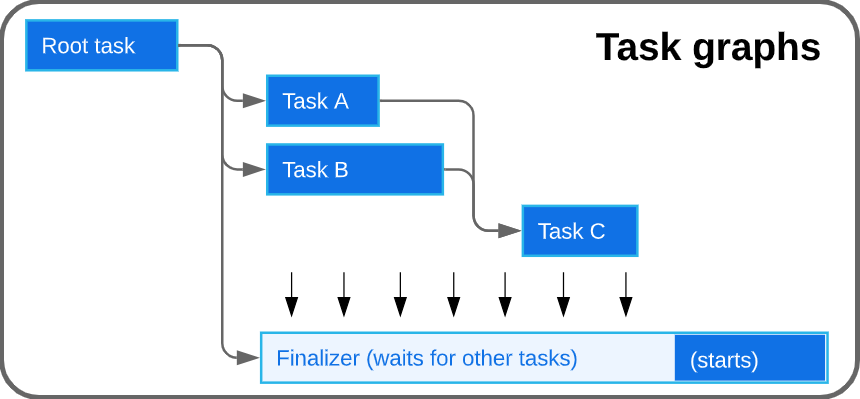
If you’re not familiar with Snowflake tasks, you’re not alone. Most people use dbt or some other transformation and scheduler tool to manage their pipelines. However, for simpler use cases, Snowflake introduced Tasks and Workflows. Tasks are SQL statements that can be chained together to define directed acyclic graphs (DAGs), resulting in SQL-only data pipelines.
You can also call stored procedures inside Tasks, but that wasn’t our focus for this project. That’s a topic for another post.
Databricks Jobs
Databricks Jobs (or, more precisely, Lakeflow Jobs), on the other hand is a
"workflow automation for Databricks, providing orchestration for data processing workloads so that you can coordinate and run multiple tasks as part of a larger workflow. You can optimize and schedule the execution of frequent, repeatable tasks and manage complex workflows."
They consist of one or more tasks, support branching, and provide a clean visual UI.
They’re widely used across data engineering and data science pipelines because of their ease of use.
Experimenting with LLMs
Migrating between two vastly different platforms comes with numerous challenges. The migration itself isn’t overly complex, but it used to be tedious manual work, so automating the migration was estimated to save around 80% of the effort.
Initially, I thought this could be easily solved by prompting an LLM accordingly.
I tried building a prototype that would get a detailed prompt of what I want to do: migrate some SQL files that make up a DAG and generate a Databricks job YAML file. Sort of what you would do when doing AI assisted development, but accompanied by a couple of extra validation and testing steps in the end.
In retrospect, this approach was overly ambitious and somewhat naive. Prompts had to be extremely precise, handle varying context sizes (imagine a DAG with 50 complex SQL statements), and still produce a valid YAML file in the format Databricks expects.
I experimented with several prompts, but none of them produced satisfying results. After sharing my findings with the team, we concluded it was time to switch to a "non-LLM-assisted" approach.
Simple, but effective
While talking to our CTO at Hiflylabs, András Zimmer, he mentioned that great solutions don’t have to be complex. Maybe we can achieve similar, or even better results by using a deterministic approach.
So, I went back to my desk to create a simple prototype. I already had a clear idea of the building blocks:
- get all necessary information of the Snowflake tasks DAG
- convert it to a json file that represents the pipeline
- convert the json file to the correct Databricks YAML format
I asked my favorite AI coding assistant to help me get started by generating the initial scripts I needed. This went surprisingly well, even the first output was close to what I wanted. After a few adjustments, the code quality wasn’t great but sufficient for our proof of concept.
Because we liked the results and feel like the this should be useful for other teams, we decided to share the solution, so below I'll describe how to use it.
Automating migration of Snowflake Tasks to Databricks Jobs
First, download the CSV output of the SHOW TASKS command in Snowflake. You might need to apply additional filters to include only the tasks belonging to your specific DAG, otherwise tasks from other pipelines could confuse our tool.
Once you're done, run
python task_pipeline_mapper.py snowflake_export.csv -o task_pipelines.json
This will do two important tasks:
Moves all SQL commands into separate files. These can be uploaded later by the user to the Databricks Workspace. We will reference the workspace paths in our YAML file later.
Generates a json file which describes the pipeline, having the following structure:
{
 "metadata": {
   "generated_at": "2025-10-02T16:33:00.361426",
   "source_file": "snowflake_export.csv",
   "total_tasks": 16,
   "total_pipelines": 16
 },
 "pipelines": [
   {
     "name": "TASK_PIPELINE_START",
     "database_schema": "DEMO_DB.TEST_SCHEMA",
     "state": "started",
     "schedule": "5 MINUTE",
     "warehouse": "COMPUTE_WH",
     "owner": "TEST_ROLE",
     "comment": "",
     "definition": "SELECT 'Pipeline started at ' || CURRENT_TIMESTAMP() AS status",
     "predecessors": [],
     "predecessors_raw": "[]",
     "children": [],
     "child_count": 0,
     "created_on": "2025-09-22 16:11:13.206 -0700",
     "last_committed_on": "2025-09-22 16:11:42.629 -0700",
     "allow_overlapping_execution": false
   },
   {
     "name": "TASK_PRODUCT_PERFORMANCE",
     "database_schema": "DEMO_DB.TEST_SCHEMA",
     "state": "started",
     "schedule": "",
     "warehouse": "COMPUTE_WH",
     "owner": "TEST_ROLE",
     "comment": "",
     "definition": "INSERT OVERWRITE INTO int_product_performance\r\nSELECT \r\n    p.product_id,\r\n    p.product_name,\r\n    p.category,\r\n    COALESCE(SUM(oi.quantity), 0) AS total_quantity_sold,\r\n    COALESCE(SUM(oi.line_total), 0) AS total_revenue,\r\n    COUNT(DISTINCT oi.order_id) AS total_orders,\r\n    COALESCE(AVG(oi.quantity), 0) AS avg_order_quantity\r\nFROM stg_products p\r\nLEFT JOIN stg_order_items oi ON p.product_id = oi.product_id\r\nGROUP BY p.product_id, p.product_name, p.category",
     "predecessors": [
       "SCHEMA.PIPELINE_1",
     ],
     "predecessors_raw": "[\r\n  \"SCHEMA.PIPELINE_1\",\r\n  ]",
     "children": [],
     "child_count": 0,
     "created_on": "2025-09-22 16:11:16.625 -0700",
     "last_committed_on": "",
     "allow_overlapping_execution": NaN
   },
   ...
 ]
}
After this step, we need to convert the json into the expected YAML format of Databricks:
python databricks_jobs_converter.py task_pipelines.json user@email.com -o databricks_workflow.yml
Notice the "user@email.com" parameter: this will be used to create the proper path to the SQL files in our Databricks workspace. In order to reference our user's workspace files we need to know this email address.
This command generates a YAML file formatted like the example below:
resources:
 jobs:
   task_pipeline_start_job:
     name: task_pipeline_start_job
     tasks:
     - task_key: task_pipeline_start
       notebook_task:
         notebook_path: /Workspace/Users/user@email.com/pipeline_start
         source: WORKSPACE
       new_cluster:
         cluster_name: 'test_cluster'
         spark_version: 13.3.x-scala2.12
         azure_attributes: &id001
           availability: ON_DEMAND_AZURE
         node_type_id: Standard_DS3_v2
         enable_elastic_disk: true
         data_security_mode: SINGLE_USER
         num_workers: 2
       max_retries: 2
       min_retry_interval_millis: 2000
       timeout_seconds: 3600
       description: 'Task: TASK_PIPELINE_START (Schema: DEMO_DB.TEST_SCHEMA)'
     - task_key: task_product_performance
       notebook_task:
         notebook_path: /Workspace/Users/user@email.com/product_performance
         source: WORKSPACE
       new_cluster:
         cluster_name: 'test_cluster'
         spark_version: 13.3.x-scala2.12
         azure_attributes: *id001
         node_type_id: Standard_DS3_v2
         enable_elastic_disk: true
         data_security_mode: SINGLE_USER
         num_workers: 2
       max_retries: 2
       min_retry_interval_millis: 2000
       timeout_seconds: 3600
       depends_on:
       - task_key: task_stage_order_items
       - task_key: task_stage_products
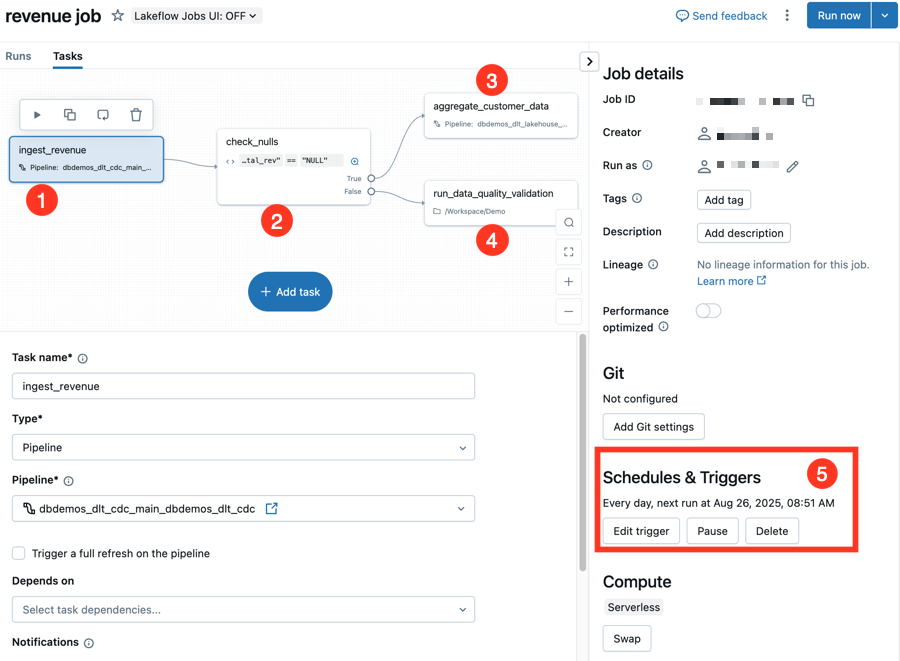
Now most of the magic is done, so it's time to open up Databricks.
First, we need to upload all SQL files to the user workspace. In Databricks, navigate to your user’s directory (typically Workspace/Users/<your_email>). Click the three-dot menu in the top-right corner and select Import. Then, upload all your generated SQL files.
Finally, let's create a Databricks job using the generated YAML file.
- Go to Jobs & Pipelines
- Click on: Create Job
- Click on the 3 dots next to 'Run now' and select 'Edit as YAML'
- Overwrite the current content with your YAML file's content
- Click on 'Save'
- Go to the 'Tasks' tab
By this point, you should see the pipeline with all dependencies in the job preview.
Conclusion
This tool isn’t magic, but it saves significant time and reduces manual effort. What used to be a painful, manual process is now a clean, repeatable workflow.
This tool isn’t magic, but it efficienty handles the logic of orchestration, acting as a reliable component within our larger toolkit. For the heavy lifting of complex code conversion and data platform migrations, our Smart Migration Assistant leverages advanced AI to ensure accuracy and speed.
If you want a migration approach that combines the precision of deterministic tools with the power of AI, check out our Databricks migration services.